The Sweep Keyboard
Background
Earlier this year, VS Code updated itself to the point where it could no longer run on my old MacBook. I started exploring alternatives, and Neovim with LazyVim quickly rose to the top of my list. I had some experience with Vim and could handle basic operations, so it seemed like a natural choice. But as I dove into my new setup, I quickly realized that the biggest challenge wasn’t the tool itself - it was me. My own typing mistakes and ingrained bad habits were getting in the way, tarnishing what should have been an exciting new experience.
“If you have to look down to find the keys on the keyboard, the benefits of learning Vim won’t come fast. Learning to touch type is imperative.” - Practical Vim by Drew Neil
As I worked to improve my typing skills, a growing interest in custom keyboards sparked within me. It seemed like an entire movement had emerged out of nowhere. With the rise of PCB manufacturing services, 3D printers, and the open-source community, countless new keyboard designs were suddenly available to explore and experiment with.
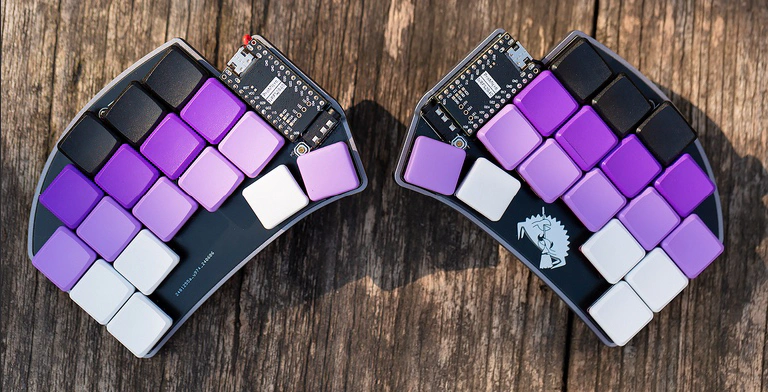
Same keyboard with different layout
The first thing that amazed me was the variety of layouts these custom keyboards offered. Everyone seemed focused on minimizing hand movement, which led to reducing the number of keys. And wow, the options were endless—home row mods, sticky keys, combos, layers - you name it. Another surprise was discovering that keyboards come in different layouts. I had always assumed that only staggered layouts existed, but I was wrong. There are ortholinear and column-staggered keyboards too.
Before diving into building one myself, I decided to experiment with my existing keyboard. The first step was remapping the Caps Lock key to Escape in the settings. I’m still not sure why I hadn’t done this earlier, especially on MacBook with a touch bar. That small change alone drastically reduced the movement of my left hand. However, my left hand still struggled with reaching Control. After reading a few blog posts, I decided to remap Caps Lock to function as Control when held and Escape when tapped.
Entering the world of Karabiner-Elements wasn’t difficult, thanks to the community providing plenty of pre-made configuration snippets. I quickly started enjoying the new functionality of Caps Lock, which I had previously ignored. I also experimented with using hjkl as arrow keys, home row mods, and even my own custom ideas.
While things were improving, I soon realized that my right pinky finger was another weak point. Using Vim required me to type a lot of symbols, many of which relied heavily on that finger. I experimented with more complex remapping through Karabiner-Elements, hoping to ease the strain, but it ended up causing more problems than it solved. In the end, I decided to fully commit to trying a different keyboard.
Building the Sweep
The Corne split keyboard by Foostan was my first point of interest. I really liked the chocolate version with 3x6x3 layout. I had ideas how I could use first column as Tab, Escape/Control and Shift and last one as Backspace, Enter and Shift. But I really didn’t want those leds. And small diodes are too big challenge for me. I am not that good with soldering.

After exploring countless options, I settled on the Sweep keyboard as my choice. The 34-key layout offered a unique challenge that appealed to me, and I was drawn to its simple, diode-free design. Plus, the fact that it could be wireless sealed the deal.
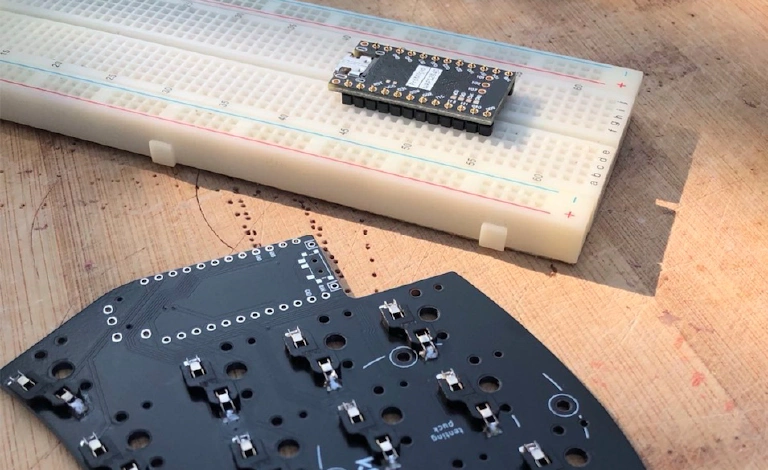
Within a few weeks, I had all the parts for my keyboard in hand. Building it from the ground up was an incredible experience. While the components were pre-designed for this project, I really enjoyed the process of assembling it all. Of course, there were some challenging moments, and a few decisions had to be made along the way. It wasn’t perfect, but in the end, I had my very first custom wireless keyboard with Choc hot-swap switches. The aluminum case was the priciest component, but with the addition of tenting legs, it added a whole new dimension, helping me better understand the feel of typing.
I chose ZMK for my keyboard because I wanted it to be wireless. Initially, I tried the Miryoku layout, but I found myself a bit disappointed with the home row mods. It’s not that the layout is bad—it just didn’t quite work for me. In the end, I settled on a custom layout based on the default ZMK, incorporating ideas from the open-source community. I imagine I’ll tweak it many times over, and it will probably always be a work in progress.
Conclusion
If I start my build today, I’d probably go with a Sweep version without hot-swap sockets. The hot-swap switches feel a bit loose, and it’s tricky to remove keycaps without pulling the entire switch. Since I don’t plan on experimenting with different switches any time soon, a non-hot-swap version would make for an even simpler build.
The column-staggered layout feels like a better fit for me, and I’ve seen progress with keys like C, V, and B. I’ve also managed to break some bad habits, like using the wrong hand for keys in the middle columns. The symbols and numbers are still a bit of a puzzle, but the sticky layer switcher has been surprisingly easy to pick up.
I’ll admit, the keyboard itself hasn’t magically improved my typing skills - I still need to practice a lot. But I’m really enjoying the process.